Sam Jackson Sweater
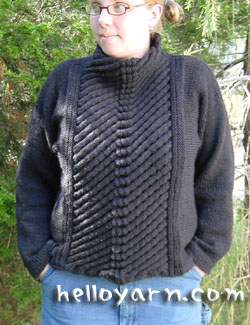
This is my interpretation of the sweater worn my Samuel L. Jackson’s character Elmo McElroy in the movie 51st State (Formula 51). All it took was one viewing of the ad for the movie and I needed this sweater!
These are just rough instructions for making the sweater around the center cable, which I have provided a pattern for. If you don’t know how to knit very well, this probably isn’t the project for you, as I am not going to be writing up a proper pattern. If you have a sense of adventure, this should be calling your name!
For yarn, I used Rowan Magpie Aran in Raven. Sadly, this yarn has been discontinued. If you want to knit this in the same gauge wool as I did, you should be getting 17 sts. and 24 rows to 4” in stockinette. I used 8+ skeins on size 7 needles and got a women’s size large sweater out of it.
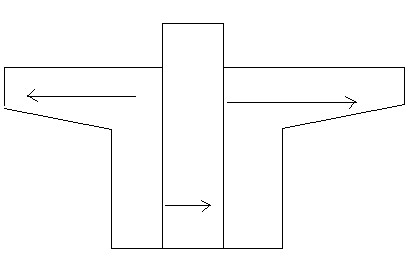
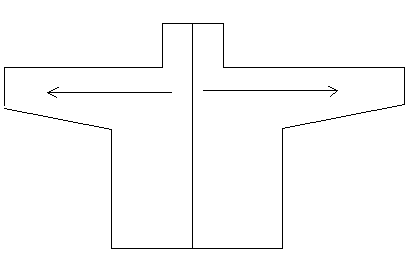
This sweater is knit from side to side. I knit the cable first, which forms the front of the turtleneck to the bottom of the sweater. I then picked up stitches on each side of the cable and knit to the sides of the sweater, joined them to a two piece back, then knit the sleeves out from there. Everything but the cable is in stockinette, so I added a hem to the bottom of the sweater body, as well as both sleeves, plus the back of the neck. It creates a nice, clean edge with no rolling.
CABLE:
C8F = Slip 4 sts. onto a cable needle and hold to front of work. K4, then K the 4 sts. off cable needle.
Figure out how long you want the cable to be. It’s knit from side to side, and one end of the cable is the top of the turtleneck, while the other is the bottom of your sweater. Cast on however many stitches you need. Take into consideration that the cable is an 8 stitch repeat that takes twice as many stitches as stockinette, so your cast on number x2 should be divisible by 8. (I cast on 108) If you’re not using my gauge, you’re going to want to swatch this cable, since your row gauge will be different, resulting in a different length of the cable, which will make your turtleneck looser or tighter than mine. My cable was 25 inches wide and 9.5 inches long, creating a turtleneck that was 19” around after the back was added.
First row: purl all sts.
Second row: k1, m1 across, to double your stitches. (I ended up with 216)
Third row: purl all sts.
Now, get to cabling.
- C8F, C8F, C8F… repeat across
- purl across
- knit across
- purl across
- K4, C8F, C8F, C8F…repeat C8F to last 4 sts., then K4
- purl across
- knit across
- purl across
I repeated these 8 rows 3 times, ending on row one. Then:
- knit a row
- purl a row
- purl a row
- purl a row
- knit a row
- knit a row
- knit a row
- purl a row
Purl one more row, then start cabling again, only this time:
- K4, C8F, C8F, C8F… repeat C8F across to last 4 sts., then K4
- purl across
- knit across
- purl across
- C8F, C8F, C8F…repeat across…
- purl across
- knit across
- purl across
I repeated these 8 rows 3 times, ending with row 1.
Next row: Purl
Second row: k2tog across, halving your stitch count.
Cast off.
TO KNIT FRONT OF SWEATER:
Decide how many stitches are to be devoted to the turtleneck. Pick up stitches (1 for 1) along the long side (on the RS of your work) of the cable, leaving the stitches that will be the neck alone. For a hem, cast on 5 stitches and always work them in stockinette. You will fold them under and hem the sweater later. Now you’ll do the garter ribbing that’s on each side of the cable.
- knit one row
- purl one row
- purl one row
- purl one row
- knit one row
- knit one row
- knit one row
- purl one row
- purl one row
Your next row will be a right side row. Knit in stockinette until you get to where you want the side of the sweater to be (for me, that was 6.25”). Leave stitches on holder and do the same for the other side (including the garter ribbing), leaving the turtleneck stitches alone. You’ll now have a relatively square piece of knitting with the front part of a turtleneck sticking up from it. All side stitches will be on holders or waste yarn.
BACK:
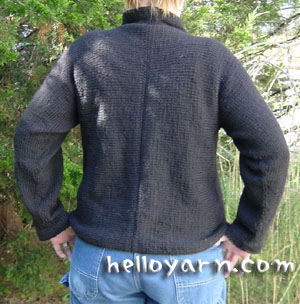
I knit the back of the sweater in two pieces and joined them at the center. This makes it so all knitting is facing out from a center point, just like the front. Since I knit the sides of the sweater together with a 3 needle bind off and just put the sleeve stitches on a small circular and knit out from there, this was the best way I could think of doing it.
For the back, I had 5 sts. in stockinette at both the top of the turtleneck and at the bottom of the sweater for hems. Once you cast off the turtleneck stitches and are knitting across from shoulder to bottom hem, you’ll only have the bottom hem stitches left.
Cast on the same # of stitches you cast on for the cable, +10 for hems. Work until you get half the neck width done (half of 9.5” for me). Cast off the same # of stitches you left alone for the turtleneck on the front of the sweater. Work stockinette stitch for the same length as the garter ribbing and stockinette combined on the front of the sweater. Put stitches on holders or waste yarn. Repeat with reverse shaping for other side of back. Either sew back pieces together to create a center seam, or pick up and knit them together with 3 needle bind off.
Now you will knit the front and back together. Figure out how many stitches you’d like to devote to the arms. I had a 19” arm circumference. Bind off (with 3 needle bind off-WS facing) the sides of the sweater, leaving the sleeve stitches on a short circular. Do the same with the other side of the sweater. Sew the shoulder seams and up the sides of the neck. Feel free to try your big turtleneck vest on and jump around. You’re almost done! The hard parts are done, for sure.
SLEEVES:
Figure out how long you want your sleeves and how much you want them to narrow to the cuff. My sleeves had a finished length of 18”, with a 1” hem, turned under and sewn. I wanted them to narrow from 19” around to 10” around, so I decreased 2 sts., starting at the armpit , every 5 rows. Knit to desired length, knit one WS row to create a ridge for easy folding, work in stockinette for another inch, then cast off. Fold that hem under and stitch.
Do this again and you’ve got another sleeve.
You might have some small holes in the armpits and where the shoulder seam meets the sleeve. Neatly sew them up. I can’t even see mine now.
Weave in your ends, hem the back of the neck and bottom of the sweater, and you’re done!
Here are some diagrams so you can get a feel for the shapes of the pieces and the direction in which they’re knit:
